
|
|


Andromeda's Parachute is a quadruple gravitationally lensed quasar located in Andromeda. It was discovered in 2017 by the Panoramic Survey Telescope and Rapid Response System (Pan-STARRS1). The four star-like images comprising the "parachute" are of a quasar whose light left it about 11 billion light years ago, gravitationally magnified and split into 4 by a foreground galaxy (G not visible but located just above image D). We're seeing the light of an object that came into existence only about 2.5 billion years after the big bang! Interestingly, quadruple lensed quasars are valuable objects for study. Because the quasar is not exactly on the opposite side of the lensing galaxy, the different images take different amounts of time to get to us. And because the quasar varies in brightness, time delays of the various images of the quasar can be accurately measured. These timings help astrophysicists to estimate the rate of expansion of the Universe (the Hubble constant) and map its space-time geometrical structure!
This is not an easy object to image. The three images in the arc are each separated by about 1", requiring lucky imaging to resolve them. Out of about 860 30sec exposure images, only 9 were focused enough to warrant stacking to obtain the final image. Even then, though A and B are clearly resolved, point source C, which is about a magnitude fainter than the other two, barely shows up in the image. Moving your mouse over the image shows a brightened version obtained from stacking 68 of the sharpest images. It clearly shows the entire "parachute" but point sources B and C melt into each other. Point source D is about 3" from the arc, and easily resolved.
I acquired this over several nights in the November 2025 with my 12" Classic Meade and focal reducer on a Paramount MyT, using a cooled ASI2600mc camera. Out of three nights and about 7 hours of imaging, only 68 30sec frames were selected for the full Andromeda's Parachute view, but only 9 frames made it into the final image partially resolving the lensed quasar images!
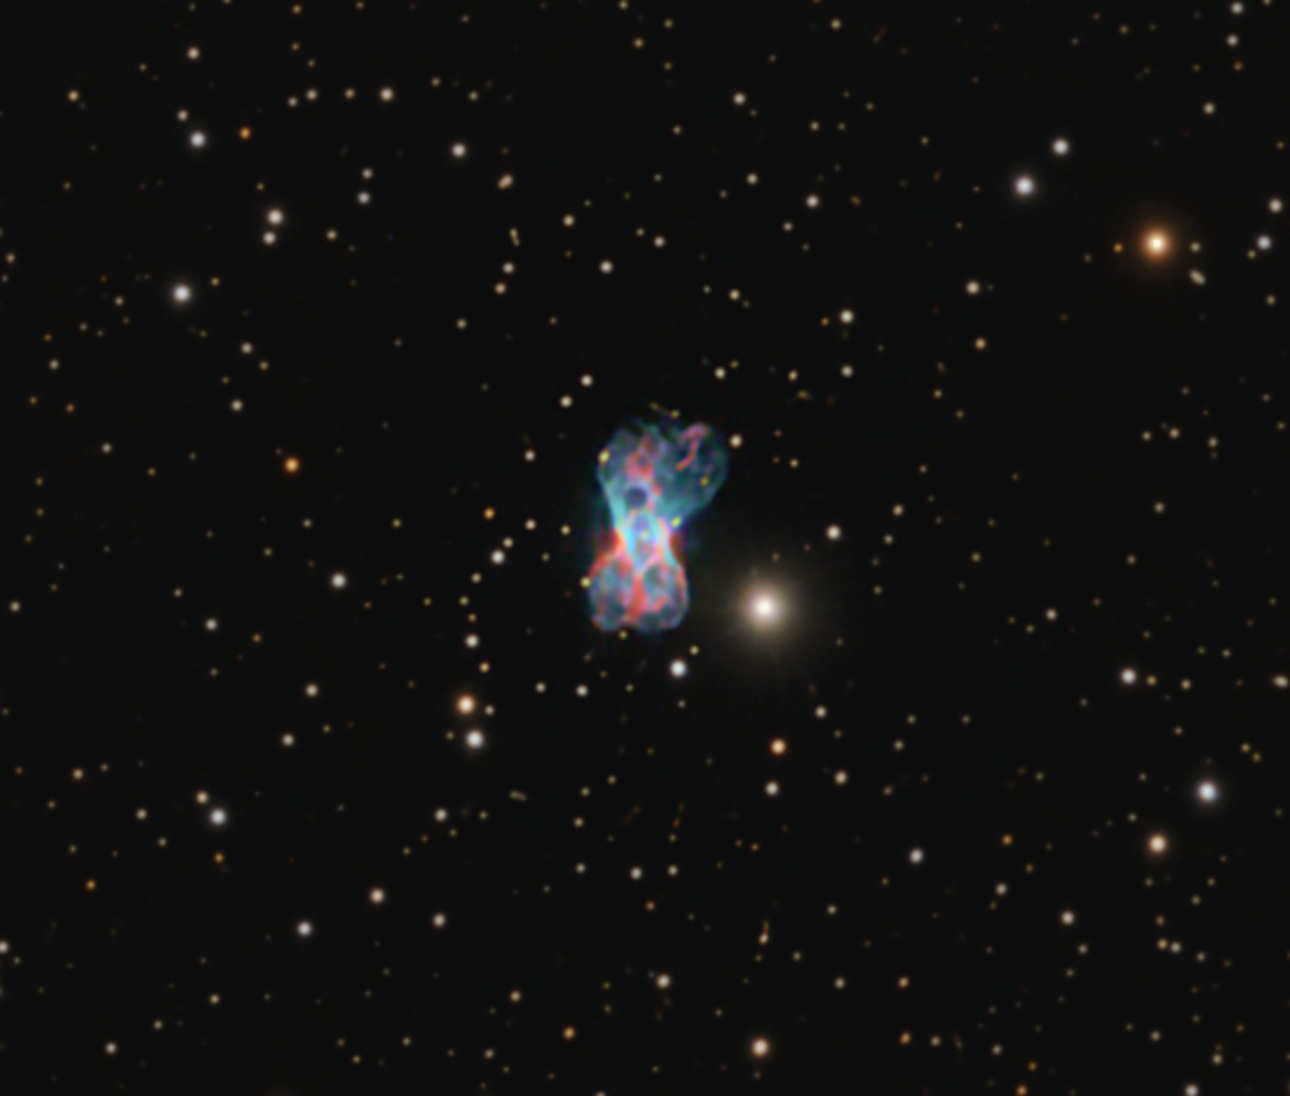
This is NGC7026, a planetary nebula nicknamed the "Cheeseburger Nebula". It's an intricate 11th mag bipolar planetary nebula about 6000 light years away in the constellation Cygnus. My previous attempt with my 10" just didn't do it justice. It's actually one of the most intricate and beautifully colored planetaries around! I was able to acquire a very nice, sharp image of the lobed structure of this nebula. If you hover over the image, you'll see an overlay of the Hubble image, but I didn't spend 16 billion dollars taking my picture !
I acquired this over several nights in the July 2025 with my 12" Classic Meade and focal reducer on a Paramount MyT, using a cooled ASI2600mc camera. I stacked 215 3min unguided exposures for this near 11h total exposure.


I now have two successful imaging attempts of Tiangong! I'm still struggling trying to figure out how to adjust the tracking in real time. My second most recent attempt on July 23, 2025 (on the right) was actually worse, but I did manage to improve my focus and captured a total of only about 11 frames, of which these are the best nine.
I take advantage of the large chip size of my ASI2600mc and use it (along with my 2.5X Powermate) to image the CSS. I had tried before using my standard planetary camera ASI385, but the chip was just too small to accommodate the tracking error of my Paramount MyT. Then I tried the ASI2600mc using a 1024 width ROI to get the frame rate up, but the FOV was too small even for that! Finally I thought I'd try the entire frame (6248 x 4176)... I was getting only about 2 frames per second, but it worked! I was able to make manual adjustments during the tracking to keep the station in the FOV and even had time to start adjusting focus, though with much room for improvement.
I used my ASI2600mc with a 2.5X Powermate and UV/IR cut filter. The image on the left is the CSS tracked from about 4:59pm EST for 2.5 minutes on Jan. 8, 2025, acquiring just over 300 frames. The best dozen are shown here in chronological order as it traversed the sky. I also uploaded a drawing of the actual space station here for comparison.
On the right, I tracked the CSS from 9:29 for about 3 minutes on July 23, 2025, acquiring a total of about 400 frames, of which only 9 were good enough to show here. You can defintely see the shape of some of the modules, but the solar panels are almost completely edge-on. I had great focus this time, but was unable to track it very well.


This is the gravitational lens SDSS-J103842.59+484917.7 in Ursa Major, also known as the Cheshire Cat. The image above is a 24 hour exposure using my Meade 12″ SCT and ASI2600mc cooled camera, using 484 unguided 3min exposures I took this over 6 near moonless nights in late March and late April 2025. It could use another 24 hours but I don’t think I’ll get to that this year! Below that is a zoomed view of the gravitational lens with just a hint of the Cheshire Cat smile! The two eyes are the galaxies SDSSCGB 8842.3 and SDSSCGB 8842.4 and the “smile” is a set of 4 gravitationally lensed galaxies. Red shifts of z>2 puts them at a distance of more than 10 billion light years away! Lastly, the image below that (and just above this text) is a Hubble version of the cropped region just for comparison. It's hard to believe a backyard amateur telescope can capture photons that have traversed nearly the entire length of the Universe, and that came into existence more than 6 billion years before our planet was born!
Image processing was pretty meager with Pixinsight, as I was more interested in just detection. I applied ABE, BlurXTerminator and simple brightness/contrast enhancement.
|
I took this image over an entire week from my backyard in Concord MA, combining 323 3min unguided exposures to give me a 16hr exposure of this beautiful region. As usual, I used my 12" LX200 Classic Meade on my MyT Paramount with my ASI2600mc cooled camera and processed the image in Pixinsight. Moving your mouse over the image overlays a higher contrast version for low contrast monitors. My PI workflow, in case you're interested: ABE/BXT/SPCC/EzDenoise/ArcSinhStretch, followed by StarNet++ to remove the stars, then separate processing of the nebula regions, reintegration, and final enhancement. Of course, the art is in the enhancement of the nebula regions... I usually spend time preparing various masks for regions I want to blur, with time proportional to the complexity of the regions, then selectively apply and enhance! |
|
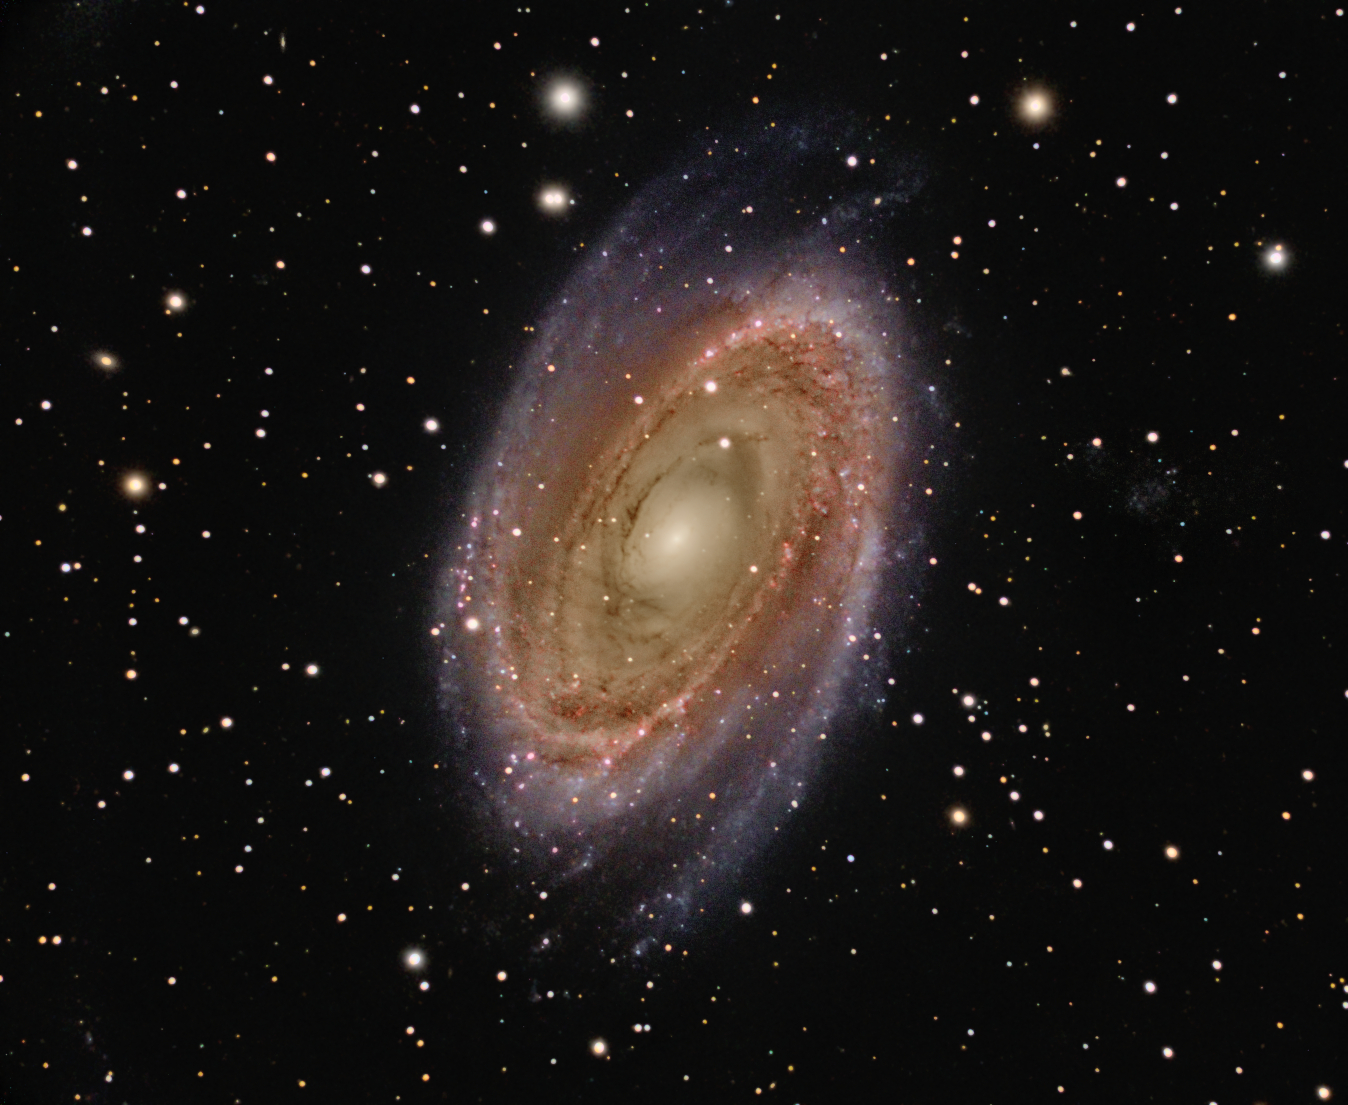
So, here is NGC6951.. this is barred spiral galaxy in Cepheus, about 75 million light years from Earth. Its nucleus is active with a supermassive black hole at its center. I was happy to see its nucleus nicely resolved! If you zoom in on the center of the galaxy, you can see a beautiful little circumnuclear ring of stars with a radius of about 5 arcseconds. The galaxy is in a field of Integrated Flux Nebulosity, shown throughout the image. If you have a low contrast monitor, you can hover over it to get a higher contrast version. I probably could have used twice as much time on this to really pull out the IFN, but I was able to get some of it here. As usual, I processed this using Pixinsight and GIMP. The main difficulty was an inability to fully extract the brighter stars from my background. I'm still using StarNet++ to do that and am thinkinig about switching to StarExterminator. |
|
I took this gorgeous shot of the prominence using a Canon T3i with a 300mm telephoto lens, 1/1000s using ISO100 at f/11. The mottled perimeter is referred to as "Baily's Beads" - sunlight peeking out through the mountains on the Moon. I was hoping I would catch them this time! See the rest of my eclipse pictures here. |
|
I've convinced myself combining HA with RGB really is more of an art than a science, especially when trying to use the HA from an L-enhance filtered image. The main idea is to try to isolate (as well as possible) the HA signal in the red channel of the L-enhance image. You'll see all sorts of heuristic formalae on the net to do that, but the general goal is to find a way to somehow A. subtract the stars and B. to subtract what might be non-HA red signal. (A) can be accomplished by subtracting the stars from the red channel L-enhance image using e.g. StarNet++ or something analogous. (B) can be accomplished by (roughly) subtracting the RGB red channel from the red channel L-enhance image. The latter is a little more complicated than that, but that's the general idea. Finally, adding the HA to the RGB is done through pixel math, weighting the isolated HA signal in anyway that pleases you. After all, what matters the most is how the image looks to you. You can mouse-over the image to see my relatively unprocessed L-enhance image and HA regions more clearly. I sacrificed some of the HA detail to get a "prettier" final image, but I liked the warmer color and almost liquid-like texture of the core. The HA image just seemed so cold and sterile to me, like the hydrogen emitting it. |
|
The image is a 17hr exposure consisting of 365 3min unguided images taken through my 12inch Meade classic on my beautiful Paramount MyT. I took the images using my ASI2600mc on a series of nights in the first two weeks of November 2023 from my Concord, MA backyard. I had originally planned to combine data from L-enhanced filtered images to enhance the multiple HII regions, but with over 17h of data, I really didn't need to! My workflow was pretty typical, SPCC, followed by BlurXTerminator, and EZ Denoising. I then extracted the stars using StarNet, applied a generalized hyperbolic stretch (which I'm getting much better at), then local histogram equalization, a blur to the background, followed by the use of the DarkStructures script and some nonlinear histogram adjustments. After recombining the image with the stars, I did some minor tweaks to the saturation and graylevels. |
|
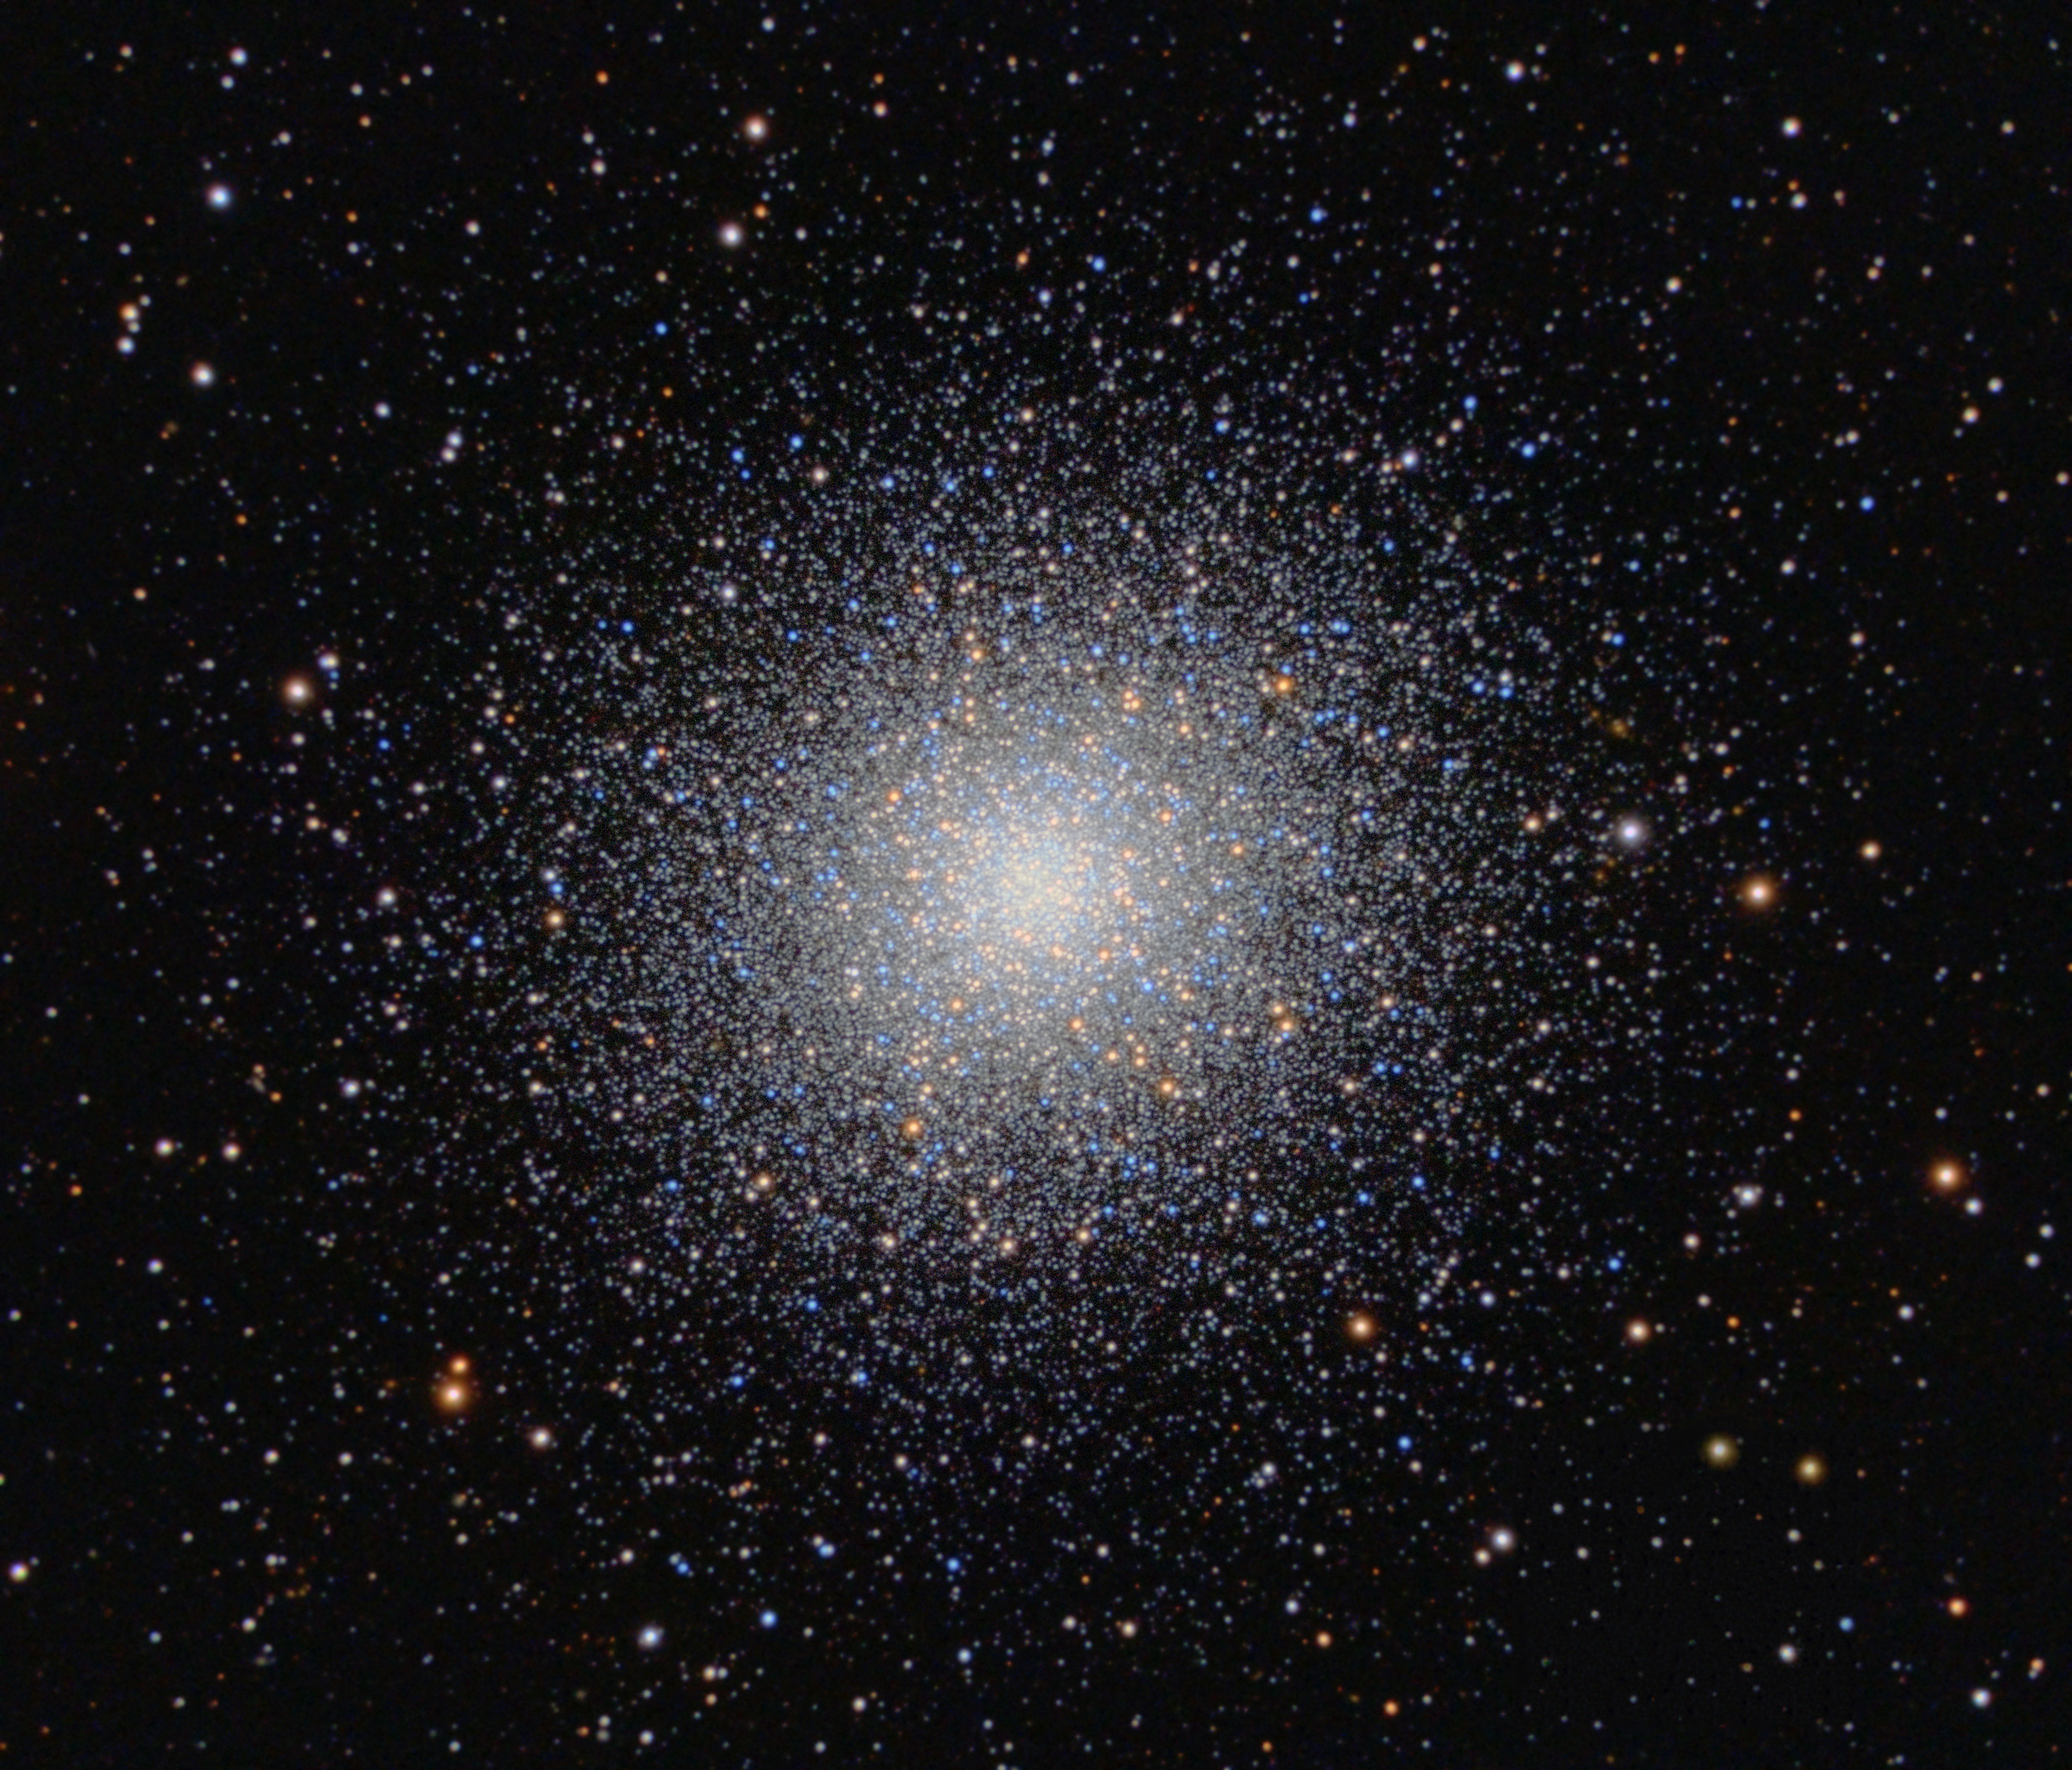
Both of these were stacked in DeepSkyStacker and processed in Pixinsight. I still struggle with getting the colors right in my globulars, and, despite using the SPCC (Spectrophotometric Color Calibration) in PI, I still end up using SCNR to remove excessive green signal from my images. Finally, I have to say it again, BlurXTerminator really saves quite a bit of time in processing. Provided you are conservative in how you use it, it continues to do an outstanding job in deconvolution, resulting in nice, crisp star images with no noticeable artifacts. |
|
This image is a 9hr exposure consisting of 179 3min unguided images taken through my 12inch Meade classic on my beautiful Paramount MyT. I took it back in Nov. of 2022 from my Concord, MA backyard. I initially criticized BlurXTerminator for not divulging enough detail about the training methodology used to develop the deep learning net, but I've convinced myself through more reading and my own empirical tests that it seems to be doing what it claims it does, and that is accurately estimate the local deconvolution parameters necessary to adaptively deconvolve the image. And it really does a pretty outstanding job. It particularly excels at galaxy cluster images like this one, where it locally deconvolves the star regions without touching the galaxy structures. So I finally broke down and purchased a license. I admit the $100 is a little steep for an add-on, and I resisted on principle. However, I cannot deny it saves me a significant amount of time, performing deconvolution as well or better than I can manually and in a much shorter period of time - so there it is. |
|
|
|
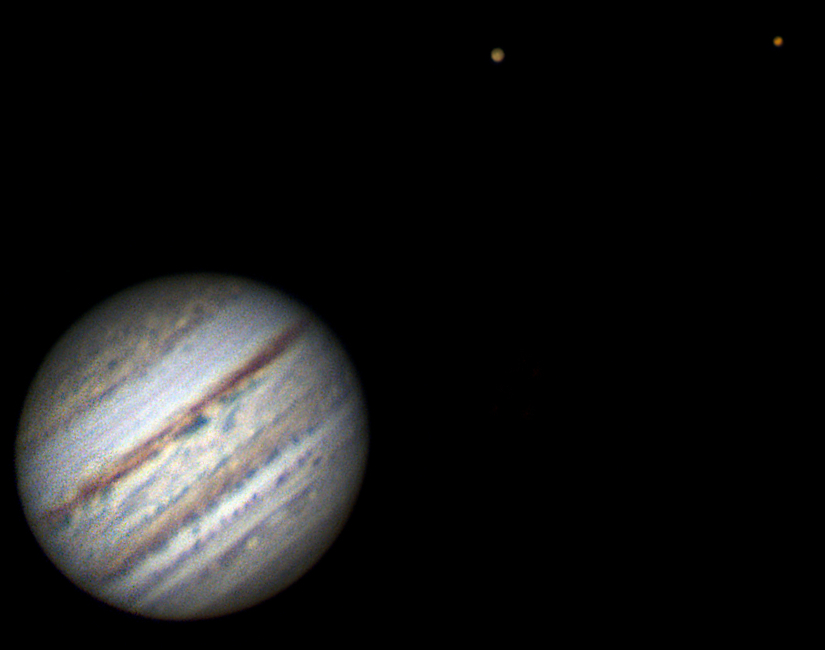
So this is a sampling of some of the best results I was able to get this year, between Aug. 30 and Oct. 7. The weather was never great, but I had some better than average moments, giving me these. I used an ASI385mc on my 12 inch Meade Classic, with a 2.5X Powermate and an ADC, giving me about 7620mm focal length and about 0.1 arc seconds/pixel images scale. I also transitioned to using AutoStakkert (instead of Registax) and even tried my hand at Winjupos! (which is not as complicated as it looks). The two images on the left and two on the bottom show some outstanding detail in Jupiter's bands, some of the best I've been able to get so far. I was even able to get some detail on Ganymede and Io! I was always skeptical of others who claimed to be able to do that, but I convinced myself that what I was seeing were real details and not artifacts of the processing. The colors of Io and Ganymede certainly came out nicely. The top right shows an Io moon transit on Aug. 30 and the middle right gives a nice view of Io and the red spot on Sept. 16. Conclusions? Well atmospheric conditions still rank highest on the list as the most important and most difficult factor for successful imaging. Focus definitely next, then the ADC I was pleasantly surprised made a noticeable difference. Of course having Jupiter at a staggering 49" in diameter certainly helps! |
|
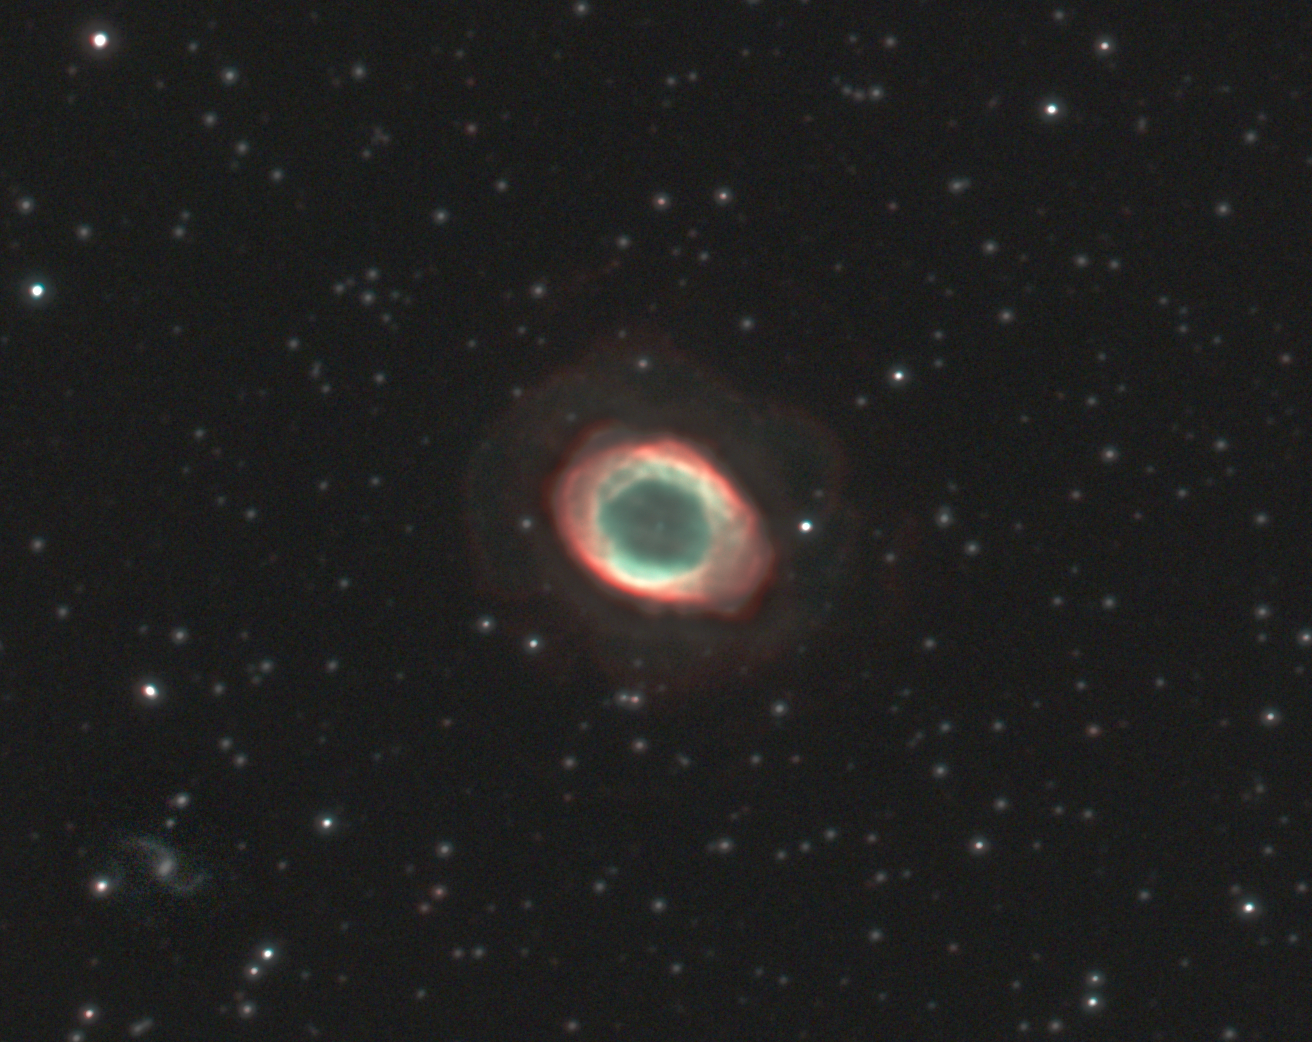
This planetary stands out for many reasons. It was the first planetary nebula ever found, by Messier, and has one of the largest diameter white dwarfs at its center. At about 1200 light years distant, its dwarf star collapsed about 15,000 years ago, ejecting the material we now see as the brightest planetary nebula in the Earth sky. |
|
Neither is imaged very often (I think) because they really require long exposures to bring out their beautiful detail. NGC4214 in Canes Venatici is a barred irregular galaxy larger and more luminescent than the Small Magellanic Cloud but about 10 million light years away. Its companion galaxy UGCA 276 is faintly visible in the top left part of the image. It's known to be a very active galaxy with several starburst regions in its center. NGC3077 is also a starburst dwarf galaxy just a little further at 12 million light years. Its disrupted structure suggests some sort of galaxy interaction in its past. Its young star bluish core has a small inner disk of older stars visible as a small reddish peanut shaped object in the galaxy's center. What a stunning little galaxy! Both of these were stacked in DeepSkyStacker and processed in Pixinsight. It really is true... there's a clear inverse relationship between your exposure time and the amount of image processing needed to enhance your images! |
|
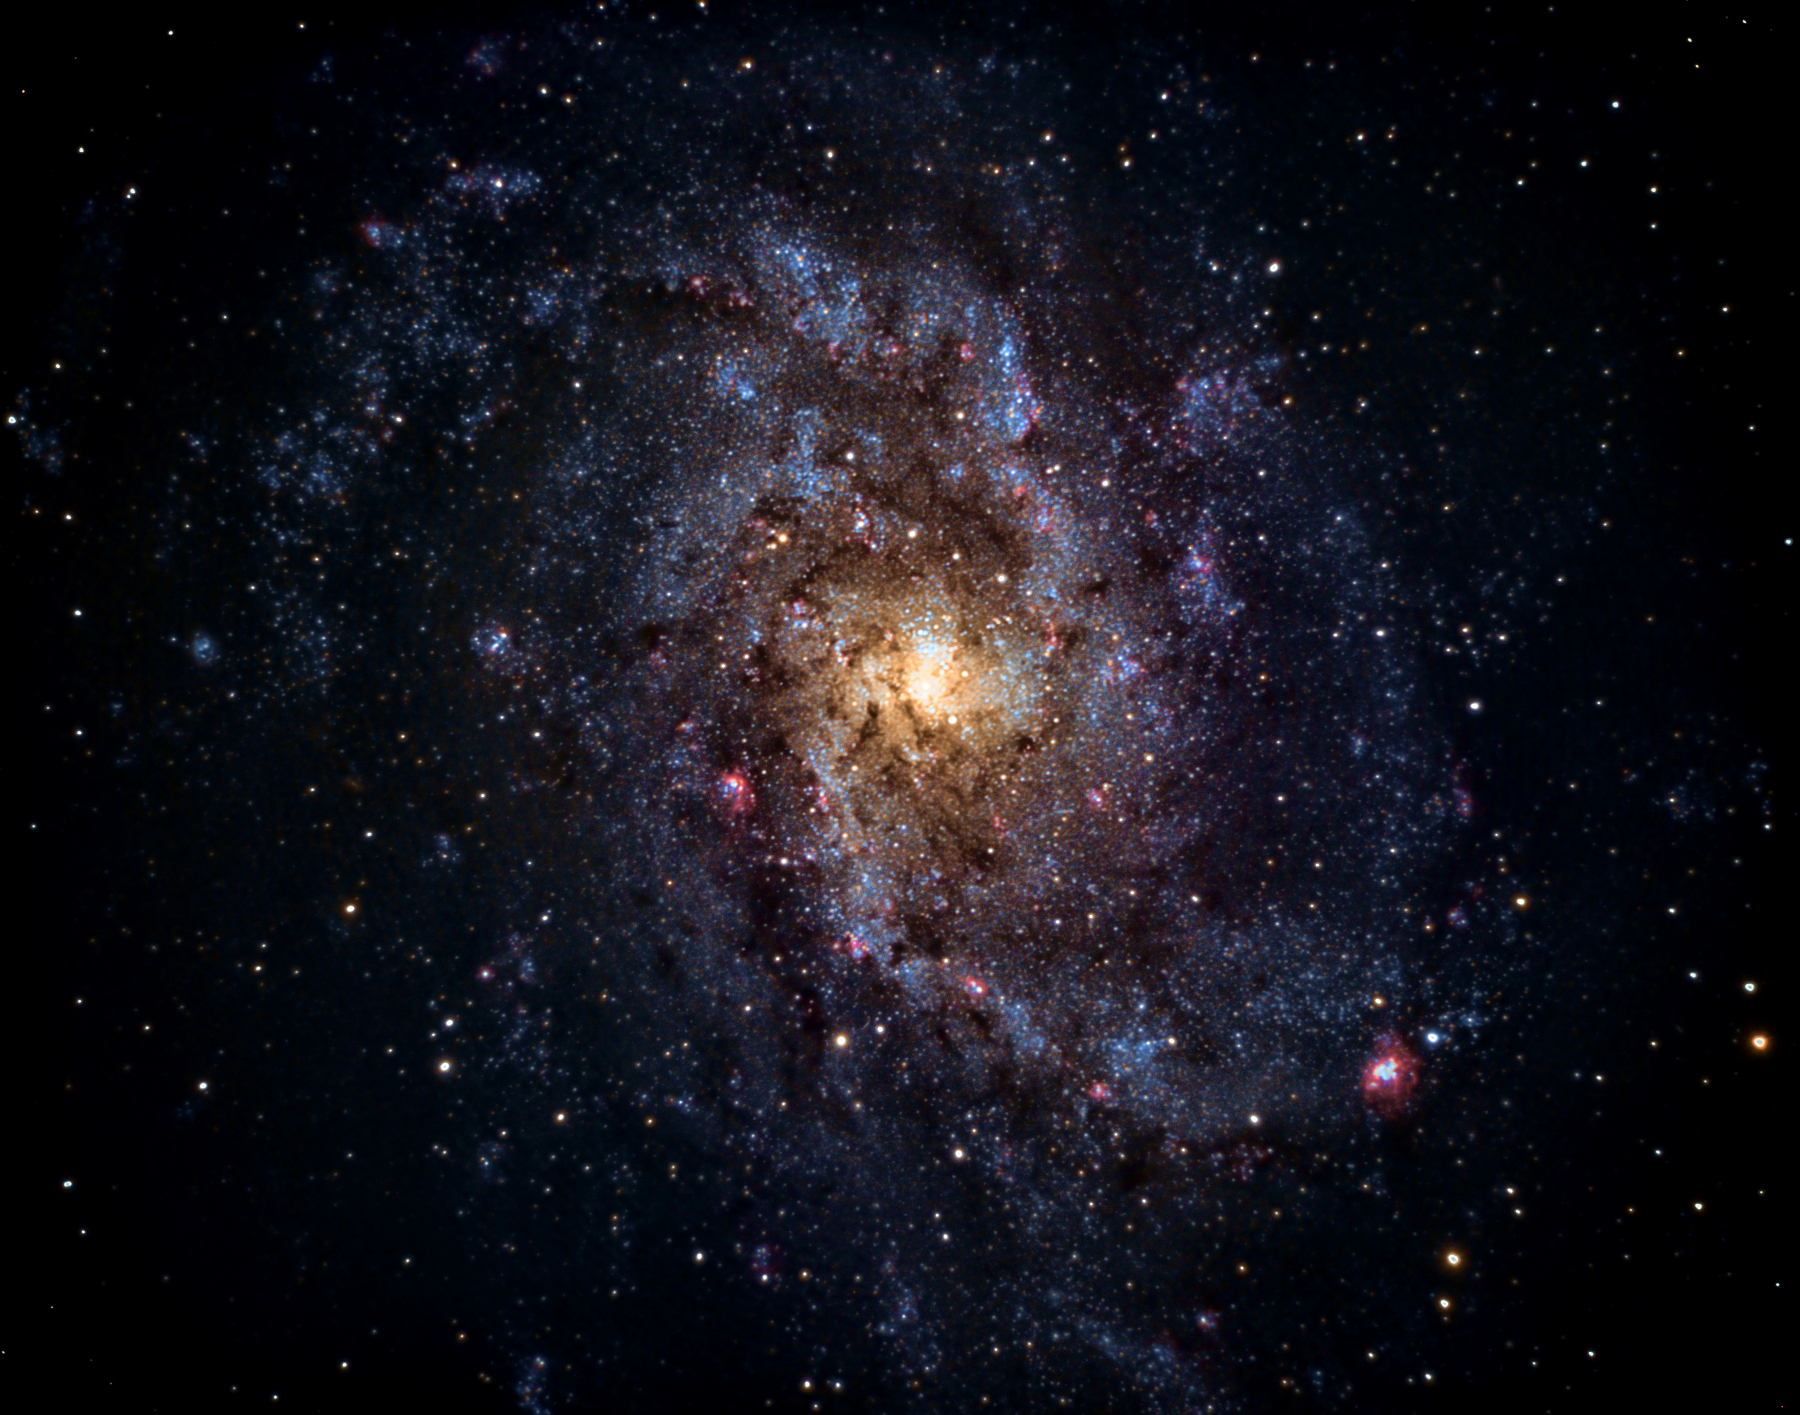
This is nicknamed "The Hidden Galaxy" because of its location near the galactic equator, amid clouds of dust that obscure the galaxy from view. The galaxy sits nestled in a beautiful star field that I actually attenuated slightly to showcase the galaxy. The galaxy is actually about 2/3 the size of the full moon; if it were elsewhere in the sky, it would be visible to the naked eye! About 10 million light years away, this face-on spiral galaxy is about 70000 light years across and contains multiple regions of starburst activity. In addition to my usual Pixinsight workflow, I also used, for the first time, a set of morphological operations on the stars to reduce their impact. The very bright and busy starfield almost drowns out the impact of the galaxy. The erosion on the stars softened their impact nicely to give a much softer look. |
|
|
|
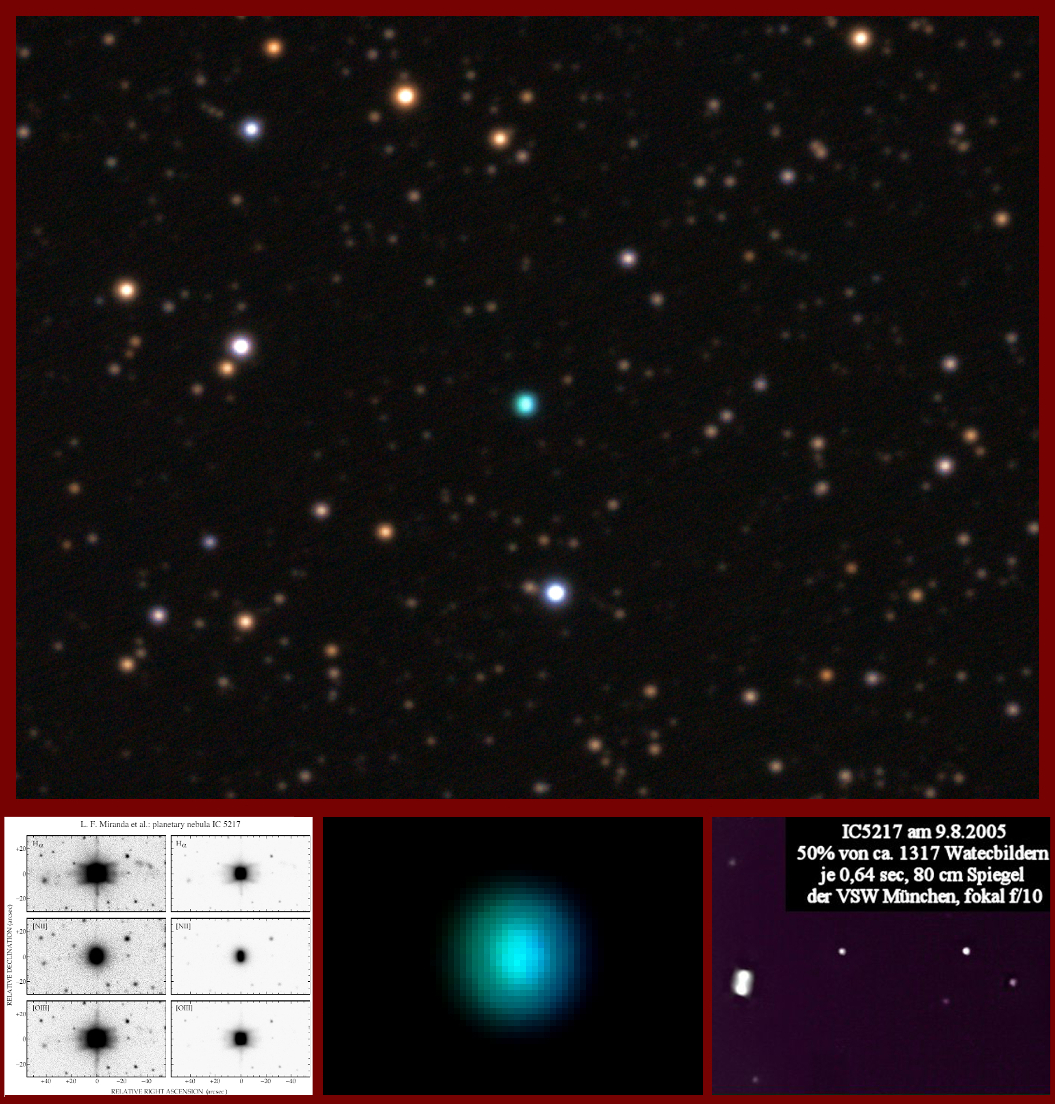
The small ring shows up quite clearly in both images. It was interesting that the tiny central star and its companion star on its periphery, were both completely invisible in the L-eNhance image. Either both stars emit in OIII and hence have little or no contrast against the nebula, or they're invisible in Halpha *and* OIII - either explanation is quite strange! Overall, I was quite pleased with the images, especially because of the number of galaxies in the field of view. The detail in this small nebula (22" in diameter) also came out well I thought. |
|
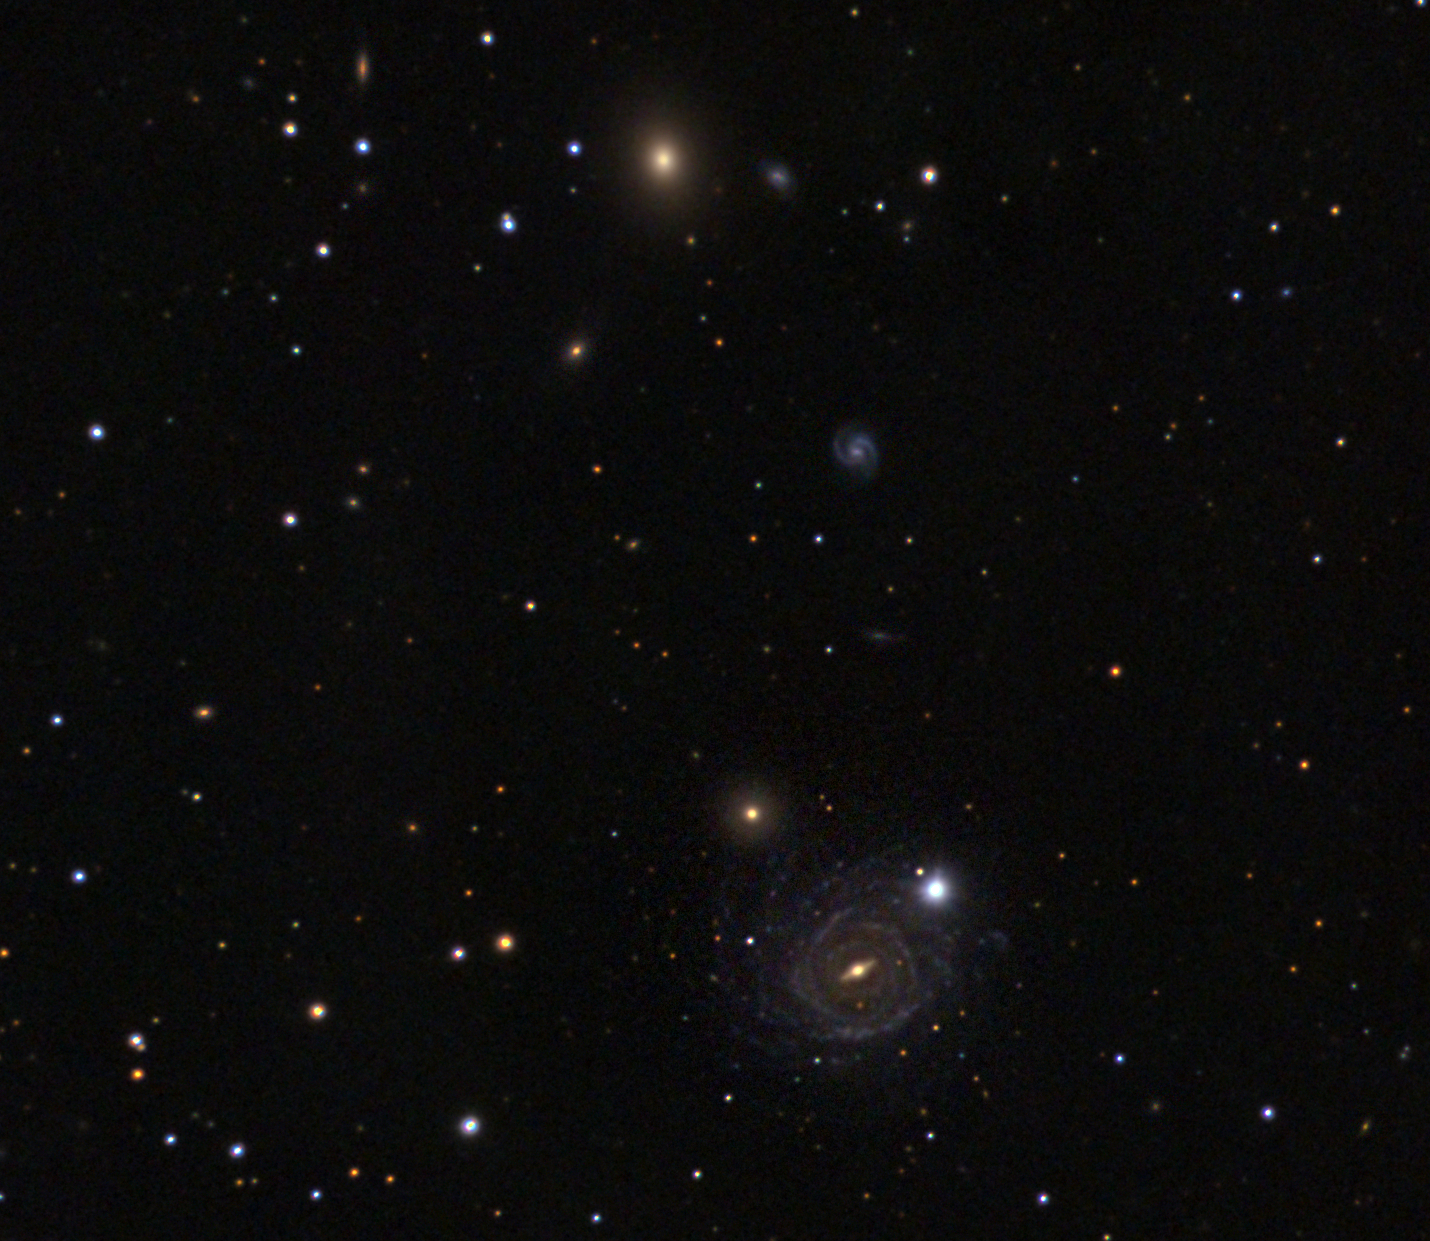
These are four galaxy clusters I've imaged recently, using my 12" LX200 Meade and my cooled ASI2600mc camera, all obtained using 3min unguided exposures: a beautiful interacting group of galaxies, called Stephan's Quintet in Pegasus (top left), NGC7331 in Pegasus, with at least 6 other galaxies in the field of view (top right), NGC4438, known as the Eyes Galaxy with associated galaxies in the Markarian Chain of galaxies in Virgo (bottom left), and NGC660, known as the Polar Ring Galaxy in Pisces. The first three were obtained with about 4 hours of exposure time, while the last was obtained using about 6. You can click on the links to get more imaging info. For anyone interested in my processing, I stacked the images in DeepSkyStacker using darks, flats and dark flats, then processed the stacked image in Pixinsight using my standard workflow: DBE, Photometric Calibration, Chrominance Noise Reduction, Masked Stretch, Luminance Noise Reduction, Deconvolution and then multiple Curve transformations. Of course I couldn't have processed these without making extensive use of masks for many of these steps, something Pixinsight lets you do with ease. |
|
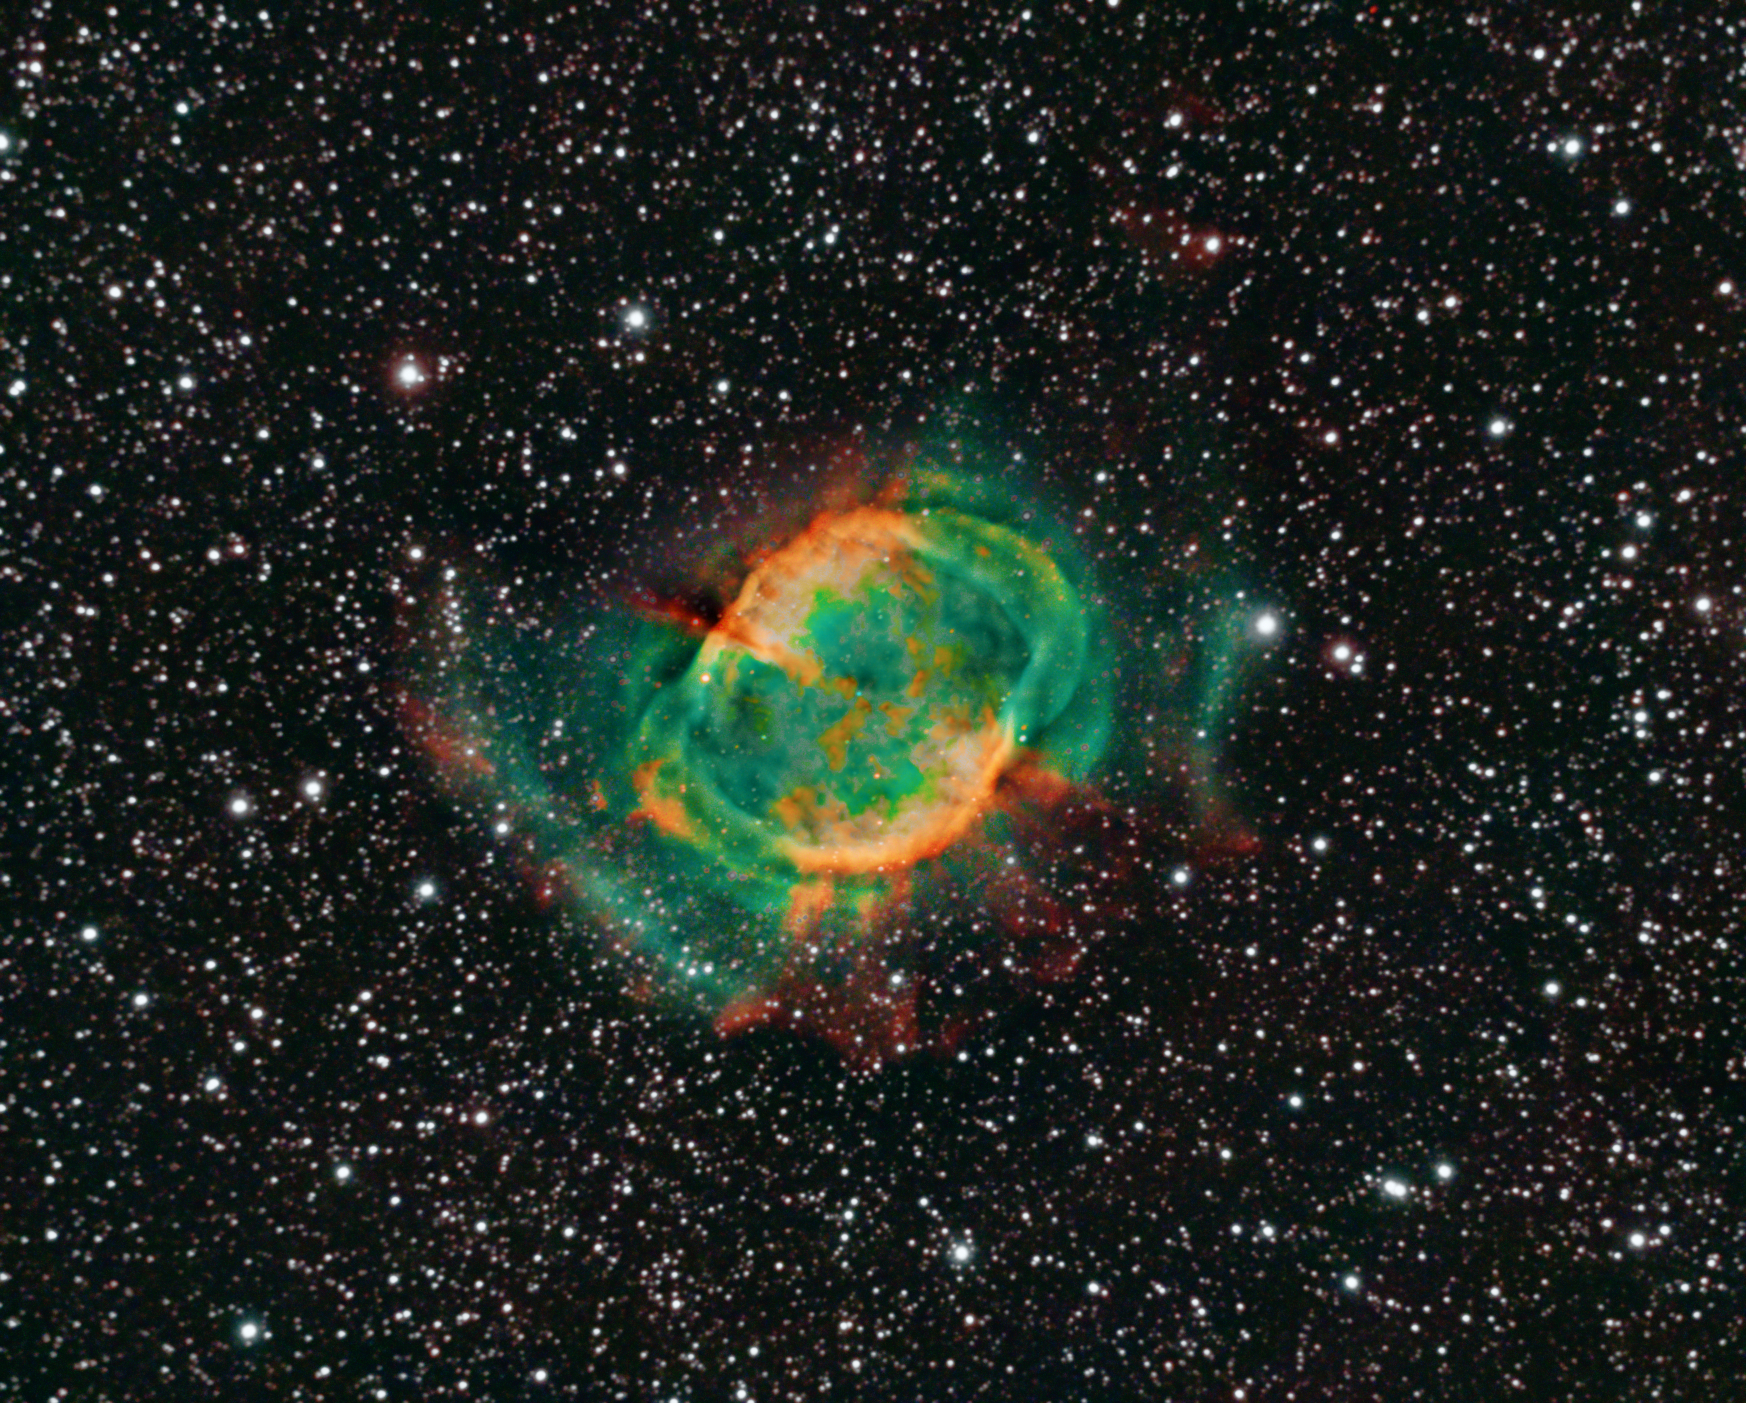
I captured this image using an Optolong L-eNhance filter through an ASI2600mc camera mounted on a 12 inch Classic Meade and Paramount MyT. It's a 5 hour exposure, processed using Pixinsight. I processed the image in two ways, once showing a more realistic differential level of brightness between the inner nebula and its outer envelopes (left) and a second time enhancing the outer envelope to match the brightness of the inner nebula and to highlight the outer envelope structure (right). I would refer to these as the scientific version (left)and the artistic version (right) with (full image details here) - for some reason, artistic embellishments of astronomical objects really bothers me - the Universe is beautiful enough without my help. But I broke my own rule this time just to showcase some beautiful structure you can only get with narrowband imaging. |
|
|
|
|
|
For those who might be interested, I used my typical Pixinsight processing (rougly in order): custom DBE, Photocalibration, Chrominance NR, Masked Stretch, Luminance NR, then multiple masks for enhancement (multi-scale and curves transformation) to emphasize local structures, e.g. core, spiral arms, extended halo, followed by a final star saturation enhancement. |
|
I took this March 9, 2021 with my 12 inch SCT on a Paramount MyT using my ASI2600mc. Interesting comparison between this image and my last attempt (only a 10 minute exposure) with my 10 inch (right above) rotated and cropped/scaled to the same field of view. Looking at the FOVs shows you what a difference the placement of a focal reducer makes... Meade series 4000 f/6.3 on a 12 inch (left) and OPTEC Lepus 0.62X on a 10 inch(right). You would think the field of view on the 12 inch would be at best the same or smaller, but clearly I'm actually getting a larger field of view on the 12 inch! Aside from that, I learned a new trick in PI...to get rid of magenta stars, invert the image and use SCNR...works like a charm! |
|
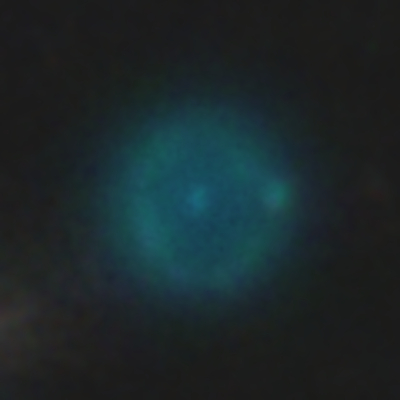
I didn't realize the Owl Nebula could look so beautiful in narrow band (in this primarily Halpha and OIII). I'd been trying for years to get a decent picture of M97, but it always seemed so amorphous and lackluster in my limited attempts. Granted, my previous attempts were all limited in exposure time using my 10 inch and without a filter, but I had still held out more hope for it. Well, my effort finally paid off with this image, a 5 hour exposure with my 12 inch using my ASI2600mc and Optolong L-eNhance filter. It was done under a quarter moon in a Bortle 5+ sky but I'm thinking now it's definitely worth trying in a darker sky. I was even able to get a hint of M97's outer nebulosity - subtle - but definitely providing just enough signal to pull out its asymmetric shape. You'll have to turn up the brightness on your monitor to catch a glimpse of it though - it was extremely hard to do the enhancement to enable it to show up in the final image. What a beautiful planetary! I also like the colors the L-eNhance seems to pull out of my ASI2600mc. I don't get the blue I'd prefer from the OIII, but the green seems to come out more readily in place of it along with the occasional yellow, which is really great. My color calibration might be off a little, but I like it, so who's to tell me it's "wrong"? ***. |
|
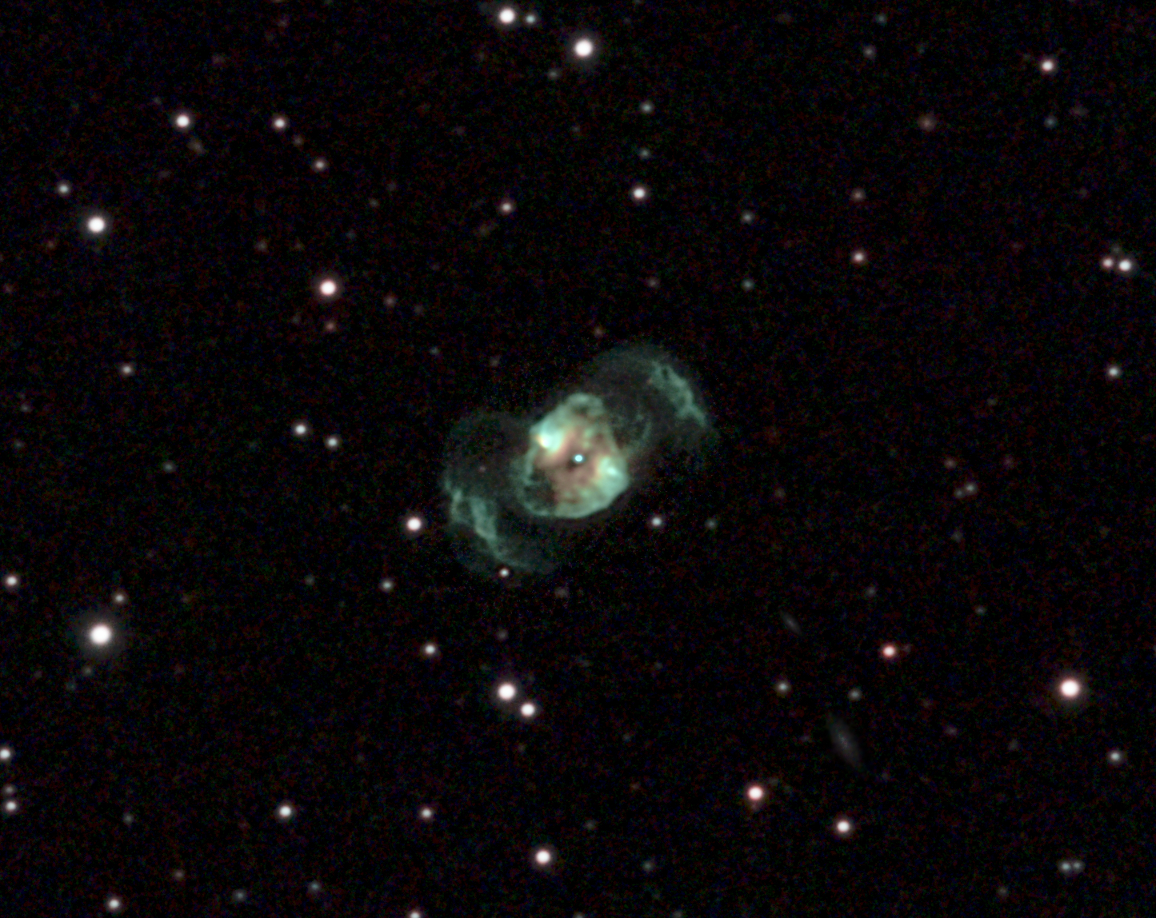
This is one of a handful of known planetary nebulae to have a central Wolf-Rayet star, an extremely hot, Sun-like star that has had its hydrogen atmosphere completely shed to reveal only a bare carbon-oxygen core. The central star's surface temperature is a blistering 240,000 degrees Fahrenheit and it lies at distance of about 4,300 light-years in the constellation Gemini. Apparently, this type of star in a planetary nebula is quite rare, which suggests that we don't really yet understand how such stars evolve. I struggled with what to do about the color for this nebula. In broadband, the nebula comes out bluish, so I was tempted to shift the hue a little to get a blue tinge for the outer parts of the nebula. However the Ha and the OIII emphasis of the L-ENhance filter seems to want an reddish/orange and green tinge to it, so I left it at that, merely enhancing it somewhat. I was surprised at the nice detail I was able to pull out of it, especially comparing it to others' attempts out there with much larger scopes and longer exposures. The images on the right show a comparison of raw images for the nebula using various combinations of data from two different nights, one completely moonless, the other with a gibbous (93% full) moon in Leo about 10deg away. The bottom row compares the same length of exposure (37 @3min per sub ~ just under two hours) with the Moon (bottom right) and without the Moon (bottom left). Comparing stars, the focus is practically identical. I would have to say I must reserve judgement on whether the difference in detail is due to atmospheric conditions or Moonlight, or a bit of both. Comparing the bottom left with the top left, both taken without the Moon, is much more straightforward. There is a clear reduction in noise going from 111min (bottom left) to 171min (top left) and the detail improves noticeably. Comparing the top left (171min) with the top right (288min) which combines data from the two nights, the result is less clear. Is it the worse data from the moonlit night that limits the quality improvement? Or is it the diminishing returns going from 3h to 5h? It's likely a little of both, but I'm tending towards the latter. Although you get detail and noise improvement going from 2 to 3 hours, I've seen much longer exposures from people with results that are the same or worse. All this says though, is that there is likely a sweet spot in terms of exposure time for all objects, but going beyond that doesn't necessarily pay. |
|
All this rambling about how narrowband filters allow you to image in moonlight is a little bit of a red herring. The bottom line is that a narrowband filter will simply rebalance the wavelengths of light that land on your sensor. You basically *see* different things because Ha, Hbeta and OIII areas of the spectrum are enhanced at the cost of other parts of the spectrum, which happen to lie in the parts where moonlight and light pollution are most prevalent. Clearly, contrast in the image is enhanced when that light is omitted, but *THAT IS TRUE WHETHER YOU HAVE A FILTER OR NOT*. And, no matter what filter you use, you are omitting wavelengths of light that might or might not be "important" to visualize your object of interest. So ultimately, it's your object that matters and what you want to emphasize with respect to wavelength, not sky conditions! However, that said, if your sky is worthless because of light pollution or excessive moonlight (or both), you might as well get rid of as much of it as possible, and concentrate on the wavelengths that are interesting to see in your object - but make no mistake - the object will naturally look different, but it will NOT be a cleaner version of the unfiltered one. If you're (extremely) lucky, a broadband light pollution filter will eliminate light pollution and moonlight but leave in, say, galaxy light that still makes the galaxy look similar to its unfiltered appearance - if so, great, but it needn't always be the case. In all likelihood, the broadband filter will remove the same light that makes your galaxy look like the galaxy you expect to see! So remember: Filtered image = different image, NOT Filtered image = same-but-better-unfiltered image. Anyway, this may seem obvious to most of you out there, but my desire to do an apples to apples comparison (with filter/without) really opened my eyes to what this is all about. Imaging details are here for the unfiltered moonless-sky version of M1 and here for the L-eNhance version of M1 in a moonlit sky, both imaged in my Bortle 5+ sky. |
|
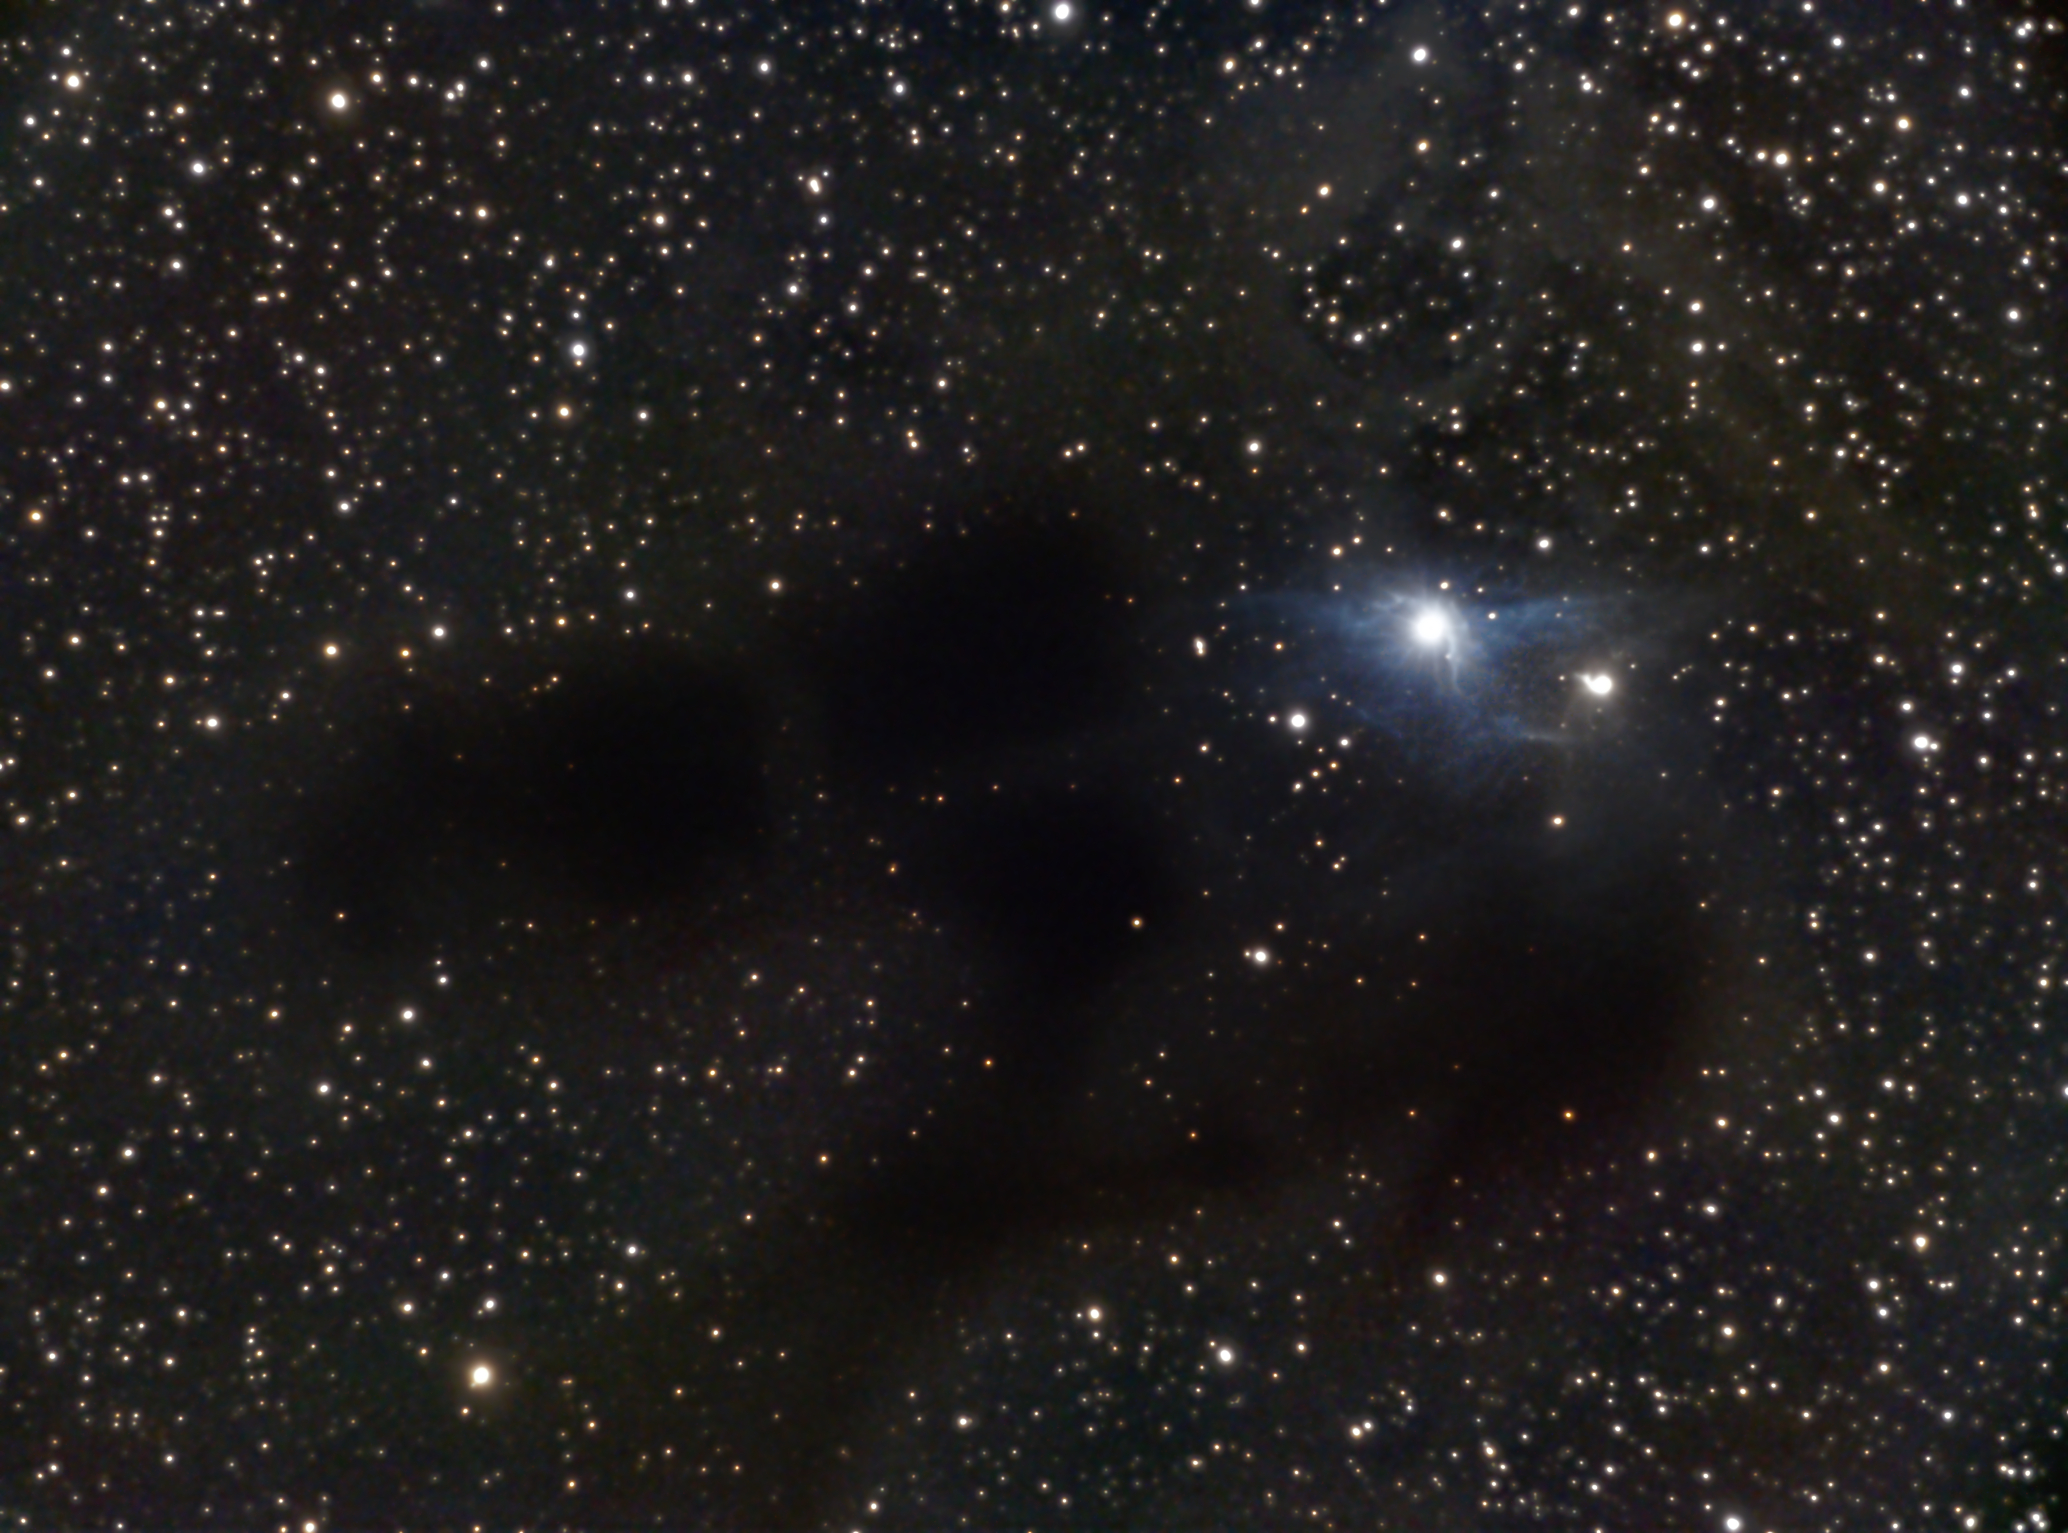
I also used StarNet for the first time to try processing a starless version of this nebula, then adding the stars back in. The result wasn't bad for a my first time...you can see my final image above on the bottom left, along with the starless foreground on the right, which I enhanced to showcase the nebulosity. This is actually a set of three dark nebula: B26, B27 and B28, from Edward E. Barnard's 1919 catalog of dark nebulae. The dark nebulae are all due to the extensive interstellar dust clouds in this region of the sky, which stand out nicely against the background star field. The beautiful blue and yellow reflection nebula is vdB 31, the 31st object in Sidney van den Bergh's 1966 catalog, surrounding the stars AB and SU Aurigae. The hot blue star AB Aurigae is around 470 light years away, which Hubble has shown to be surrounded by a disk of material in the middle of planet formation! |
|
|
|
The sensitivity of the ASI2600mc camera is notable in this 5 hour exposure, revealing nice structure in the larger pair of galaxies but also bringing out multiple edge on galaxies in the field as well, in addition to several "fuzzies" around NGC672 itself. There's no way I could have gotten this much detail using my DSLR! I took this image Dec. 10, 2020 with my 12inch classic Meade SCT on an MyT Paramount. I acquired images using a cooled ASI2600mc stacking just over 100 3 min exposures. You can see I'm slowly improving my processing with Pixinsight! You can see another processing attempt here. |
|
For those of you interested in Pixinsight workflows...screen transfer function stretch, dynamic crop, DBE with carefully selected points, histogram transformation, color calibration, deconvolution, multiscale linear transform for noise reduction, local histogram equalization (250 pixel window size), curves transformation, and finally, a masked curves transformation to eliminate vignetted corners. |
|
NGC891 is a beautiful example of an edge-on galaxy, about 30 million light years away. Its many filaments and tendrils extending out of its plane are thought to be the result of the ejection of material due to supernovae and intense stellar formation activity. In the upper left part of the image, right under NGC891, you can also see a tiny image of a distant spiral galaxy in the background. For more imaging details, look here : |
|
|
|
|


